Active Directory is a Microsoft directory service that manages and organizes resources including users, computers, and other devices. I was interested in gaining experience with this service and decided to create an Active Directory lab in Microsoft Azure. This is part 1 of a series where I learn about Active Directory and its features.
Step 1: Create a Resource Group
I needed to create a resource group that would hold the resources I needed for the project. The purpose of a resource group is to organize and group resources, simplifying management. If needed, I could delete the resources group and it would delete the resources associated with it. It made cost management easier. I was able to set up a budget for my resource group, which helped me track the costs of my resources.
Step 2: Create a Virtual Network (VNet) and Subnets
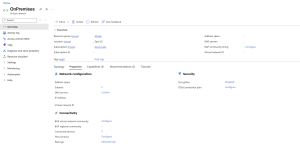
Inside of my resource group, I created a virtual network to host my virtual machines. In this step, I edited the default subnet range so that it fell within the defined range of the IPv4 address space of the virtual network. I provisioned Azure Bastion within my virtual network, creating my AzureBastionSubnet. AzureBastionSubnet is the mandatory subnet for the Azure Bastion service and it needs at least a /26 address range. The purpose of Azure Bastion was to provide a secure RDP connection to my VMs. RDP stands for Remote Desktop Protocol and allows users to remotely access and control a computer over a network. Note that with Azure Bastion, my VMs didn’t need a public IP address and I didn’t need to open any inbound ports.

Step 3: Deploy Virtual Machines for Domain Controllers
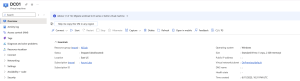
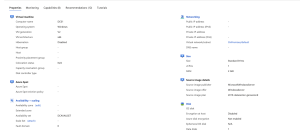
Next, I set up two virtual machines with the Windows Server 2019 image that will serve as my domain controllers. A domain controller is a server that responds to authentication requests from users and computers. These domain controllers will host Active Directory and its services. I launched the virtual machines in an availability set to ensure high availability and a lower risk of a single point of failure. I also changed the default size of the VMs to Standard B1ms to optimize cost.
Step 4: Deploy Bastion
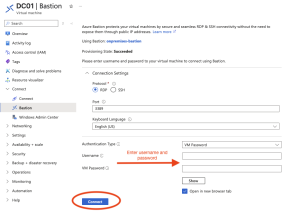
After I navigated to my VNet and selected Bastion, I deployed the service into my AzureSubnetBastion I created earlier. This will automatically created a public IP for the Bastion service itself. From there, I was able to connect to it from my browser using my VM username and password.
Step 5: Configure the first domain controller
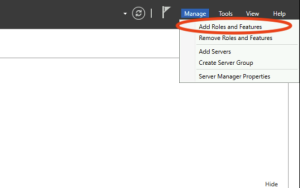
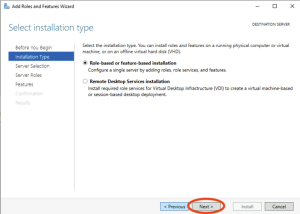
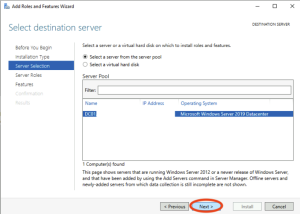
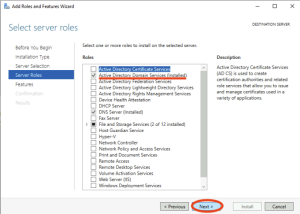
Once I connected to my VM, the Server Manager dashboard opened up. From the dashboard, I went to Computer Management > Disk Management to configure my disk. This disk hosted my Active Directory. Then, I went to Manage > Add Roles and Features, I went through the screens shown here to install Active Directory Domain Services. First, I choose role-based configuration. Then, I selected my destination server. Next, I checked off Active Directory Domain Services as my server role. Note that I already have this installed.
Step 6: Promote the first domain controller
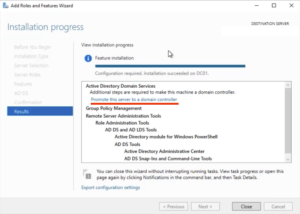
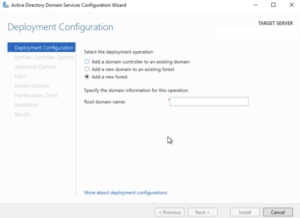
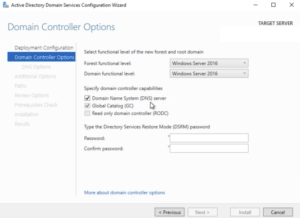
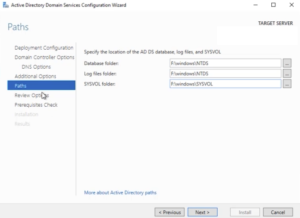
Promoting the domain controller simply means that converting a server into a domain controller. Because I already have this installed, I decided to grab screenshots I took from a Udemy course that helped me with this step. On the installation progress page, I selected the “Promote Your Server…” that you see underlined. In the Deployment Configuration panel, I added a new forest, which is the top level of organization within Active Directory. The forest contains domains, users, devices, etc in Active Directory. In this step, I specified my root domain name. Next, in the Domain Controller Options panel, I made my domain controller a DNS server by checking it off. For the Paths panel, I changed my disk paths to reflect the the disk configuration I did earlier.
After this step, my connection restarted. While my connection was restarting, I changed my Private IP for my domain controller from Dynamic to Static to ensure that my private IP address never changes. This private IP is important because it served as a DNS server for my Active Directory, is necessary to promote the second domain controller and needs to be able to read the DNS of my root domain name.
Step 7: Configure DNS
I went back to my VNet’s settings in Azure, changing the DNS servers from a public DNS to a Custom server using the private IP address of my first domain controller. This will ensure that the VMs in the VNet resolve my domain name. I restarted my VMs to make sure that this change was picked up.
Step 8: Promote & Configure second domain controller
I combined these two steps because setting up my second domain controller was the same as the first with a few exceptions. First, in the ‘Deployment Configuration’ panel shown above, I chose the ‘Add a domain controller to an existing domain’ option. Then, I supplied the credentials I created for the first domain controller. After the second domain controller was configured and promoted, I configured the DNS like I did with the first one. The purpose of creating a second domain controller is for redundancy. If my first domain controller goes down, my network will still operate because I have a second one.
Step 9: Joining a Client Machine to the Domain
I launched a third VM with the Windows Server 2022 image. This will serve as my client machine. I made sure to launch it in the same resource group as that holds my other resources(domain controller, network, etc). I then used Azure Bastion to connect to my VM.
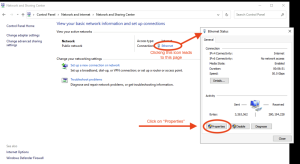
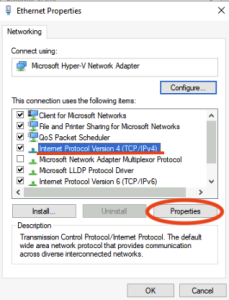
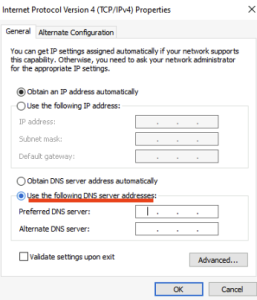
Inside my client VM, I opened the Control Panel and navigated to Network and Internet > Network and Sharing Center. Then after clicking the Ethernet icon, I set the DNS Server to the private IP address of my first domain controller. This is so this machine could find the root domain I created.
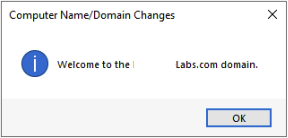
I joined the the domain by once again opening the Control Panel and this time navigating to System. From there, a page opened up and I went to Advanced System Settings > Computer Name > Change… >Member of Domain. I entered the root domain name I created earlier. After a few seconds, a prompt appeared where I entered the credentials of my first domain controller. Seconds after that I received a message welcoming me to my domain.
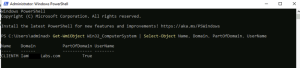
After hitting okay, another message appeared letting me know that the machine had to restart before the changes took affect. After the reboot, I verified the domain login using nslookup. I also tried my hand in using Powershell to accomplish this same task.
That is all for part 1! Through building this lab, not only did I learn about Active Directory but I gained a better understanding of networking. I learned a more secure way of connection to virtual machines using Bastion. A lesson I’ll remember is that using RDP to connect to virtual machines exposes RDP ports and this is considered a security risk. This lab was great because it introduced me to Powershell. I plan to use Powershell for future labs and projects so I am dedicating my time to learning it.
I have also learned that there is a more cost effective way of running this lab. I am working on exporting the resource group I created for this lab to Terraform. In addition, I am figuring out another way to replicate the installation of Active Directory Domain Services and joining the client machine to my domain without using a GUI. I will post the code when it’s finished.
With that I’m on to part 2!